Introduction
In this series, I will take you through building an on-premises / Azure hybrid environment, with the on-premises network running entirely on a single machine. We will set up an on-premises Active Directory forest, create OUs and users, deploy domain controllers, join Windows and Linux VMs to the domain, and establish hybrid connectivity to Azure using an S2S VPN tunnel.
I want to clarify right at the outset that on-premises identity is not a mandatory starting point for a hybrid cloud environment. But I have chosen to build it from the ground up starting with the identity plane (on-premises Active Directory) .
To follow along you do not require deep networking or Linux expertise, but comfort with basic bash and networking concepts will help — and we will build the required knowledge as we go. Where appropriate, I will reference official documentation rather than re-explaining well-documented concepts.
At the end of this series, I will share my Github repo with the automation scripts for the infrastructure.
When I started exploring hybrid environments, I assumed it would require multiple machines, dedicated networking, and possibly additional hardware. That made it feel like something I couldn’t easily experiment with on my own setup. As I explored further, I realized those assumptions weren’t entirely true. I was able to build a working hybrid environment on my laptop, keeping everything contained and manageable. This series documents how I put it together. Here’s the setup I’m using: a laptop running Linux Mint 22.1 (Xia) with 16 GB RAM, a regular home Wi-Fi router, and an Azure subscription (PAYG).Let’s get started.
Building an On-premises virtual network
In this first part of the series, I will set up the virtual network on my Linux laptop. This is the foundation for the hybrid environment we are building. By the end of this article, we will have laid the foundation which will include a virtual network — our on-premises representation and a Virtual Machine within the virtual network.
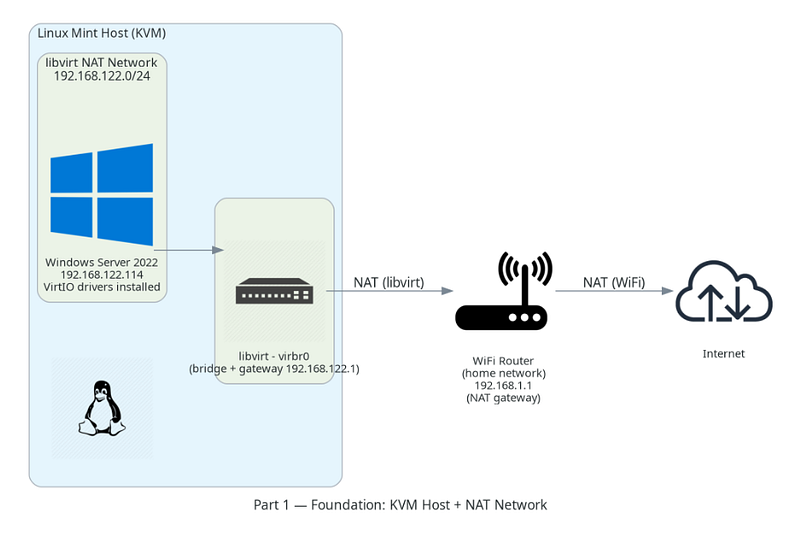
The above diagram shows what we will have in place by the end of this article.
Software prerequisites and why you need them
The on-premises network is virtual. We will need libraries and applications that enable the creation and management of virtual networks and virtual machines. Follow the below steps to prepare the environment.
Installation steps for KVM, QEMU, libvirt and virt-manager vary by Linux distribution and version. Refer to your distribution’s documentation for the correct package names and commands
- Verify virtualization is enabled — Run
egrep -c '(vmx|svm)' /proc/cpuinfoA result greater than 0 means your CPU supports hardware virtualization and you’re good to go. - Install KVM hypervisor and QEMU — These two work as a pair. KVM is the Linux kernel module that provides hardware virtualization, allowing the Guest OS to execute instructions directly on the host CPU at near-native speed. QEMU handles the emulated hardware that the Guest OS interacts with — the virtual disk drives, the network card, and the VGA BIOS that Windows thinks it’s seeing.
- Install libvirt — this is the virtualization manager I will be using to manage my virtual network. It is the control layer. It translates GUI actions into XML definitions and complex command-line instructions for the hypervisor. It manages storage pools, virtual networks, and VM lifecycle. For example, you add a new virtual hardware, say, a CDROM, libvirt will generate the XML configuration to support CDROM virtualization which will then be read and processed by QEMU.
- Virtual Machine Manager (virt-manager) — a handy GUI for libvirt. You launch it with virt-manager, and it lets you create and manage VMs but does not run them.
- Download Windows Server 2022 Evaluation version ISO file. The OS must be a server OS that supports Active Directory Domain Services and hence I’ve chosen Windows Server 2022
- Download virtIO from https://fedorapeople.org/groups/virt/virtio-win/direct-downloads/stable-virtio/virtio-win.iso
Once the above steps are completed, run virsh net-list --all This should show the default network that libvirt just created.
At this stage, the virtual network is up and all the tools needed to create and manage VMs are in place.
Role of libvirt, virt-manager, KVM and QEMU
It helps to build a simple mental model of how these components fit together — specifically, how virt-manager interacts with the underlying hypervisor.
The Management Flow (Control Plane) — when you create or configure a VM:
virt-manager → libvirt → QEMU/KVM
- virt-manager provides the GUI
- libvirt acts as the control layer, translating actions into configurations
- QEMU/KVM executes those configurations
The Execution Flow (Data Plane) — when something runs inside the VM:
User → Guest OS (Windows) → QEMU → KVM → Hardware
- QEMU handles device emulation (disk, NIC, etc.)
- KVM provides direct access to CPU virtualization features
This separation helps explain why VM configuration and VM execution are two different layers.
Virtual Networking
Before we create the virtual machine, a few networking concepts around virtual networking and libvirt are worth clarifying.
Virtual network — the private address space where your VMs live. They exist only inside the host and are not visible to the WiFi network that is connecting your laptop with other laptops, phones and other devices in your WiFi network.
Bridge (virbr0)— Layer 2 construct — the virtual switch that connects your VMs to each other and to the host, like a physical switch in a rack. Imagine VM1 wants to send a packet to VM2, it forwards traffic based on MAC address learning (similar to a Layer 2 switch) and will forward the packet to VM2. It acts like a Layer 2 switch inside your Linux host. Every VM connected to the default network, plugs into this switch.
Gateway (192.168.122.1) — Layer 3 construct — the door out of the virtual network; packets destined for anywhere outside the virtual network go here first and then get routed based on the defined route table.
Gateway vs bridge — At first, they looked similar to me. It took me some time to understand the difference. The bridge connects devices at Layer 2 by MAC address. If two VMs in the same virtual network want to talk, the bridge connects them; they bypass the gateway. The gateway is the IP address assigned to the bridge interface, acting as the Layer 3 entry/exit point for the virtual network. It is the address VMs use when sending traffic outside the virtual network
VMs talk to each other through the bridge, they talk to the outside world through the gateway, and the virtual network is the address space that gives them all a place to live.
When libvirt is first installed, it automatically creates a default virtual network with a virtual switch called virbr0 — visible via ip a. Behind this bridge, libvirt configures dnsmasq for DHCP and DNS, and uses iptables/nftables on the host to provide NAT routing. Any VM you create is connected to this network unless you specify otherwise.
libvirt modes
libvirt supports three modes, namely, NAT, Bridge and Internal. For our hybrid environment, the virtual network uses NAT mode described in https://wiki.libvirt.org/VirtualNetworking.html meaning that the WiFi router sees all packets from the virtual network as originating from the Linux host. It has no notion of the virtual network. This approach requires no changes to the home network and keeps the virtual environment isolated, while still allowing outbound internet access.
Use bridged networking if you want your virtual machines to obtain an IP address from your LAN. Or use Internal Network if you want a fully isolated lab.
Traffic flow in default (NAT) mode looks like this:
VM →
virtual NIC →
virbr0 (virtual switch) →
NAT (iptables/nftables on host) →
Linux host →
physical network →
internet
If you use bridged mode, the VM connects directly to your physical network through a Linux bridge (e.g., br0). In that case:
VM →
virtual NIC →
Linux bridge →
physical NIC →
real LAN
No NAT. The VM behaves like a real machine on your network.
Creating Virtual Machines
Now, we can start creating a Virtual Machine. This virtual machine will be the primary domain controller (will be covered in Part 2), so, let’s name it appropriately. I will call it hce-dc01. Give at least: 4 GB RAM, 2 vCPU, 60 GB disk for the virtual machine. This sizing is sufficient for a lightweight domain controller while keeping resource usage manageable on a single host machine.
Launch virt-manager from the terminal. It opens up the GUI of virtual manager. Select option to create a new VM, follow the wizard by providing configurations as outlined above. Use the downloaded ISO image and install Windows Server OS. The installation is quite straightforward.
Important — Make sure you install Windows Server 2022 Desktop Experience.
Once the Windows Server 2022 OS is installed, the VM will reboot allowing you to set the Administrator password.
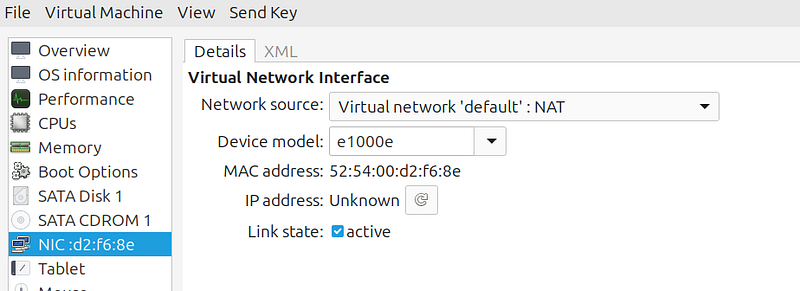
Once the VM is ready, go to the details view and verify the below settings.
For Virtual NIC choose — e1000e. This is an emulated Intel NIC that Windows recognizes out of the box — it gets you network access during installation before VirtIO (discussed in the next section) drivers are in place.
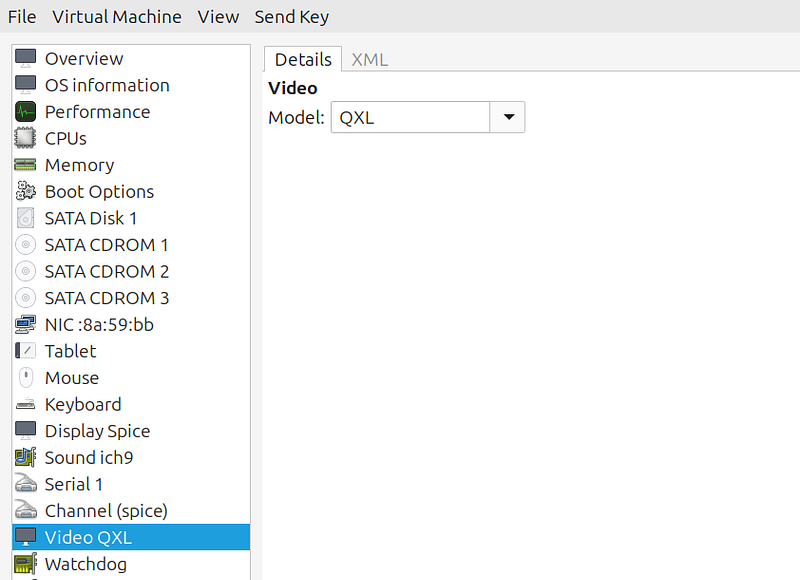
For video select QXL — this is a paravirtualized display adapter that gives you a responsive desktop with better resolution support compared to the default VGA
Add VirtIO ISO as CD-ROM in virt-manager
What and Why? — [VirtIO](https://wiki.libvirt.org/Virtio.html) is a paravirtualized device interface used between Windows and QEMU. Instead of emulating physical hardware like SATA or Intel NICs, VirtIO provides purpose-built virtual drivers that both the guest and hypervisor understand directly — reducing CPU overhead and improving throughput.
Follow the below steps to install VirtIO
- Open virt-manager → select your VM → Open → Show virtual hardware details
- Click Add Hardware → Storage → CD-ROM
- Choose Select or create custom storage → point to
~/ISOs/virtio-win.iso - Boot (or reboot) the VM
Now inside the VM you will see two CD-ROMs:
- SATA CDROM1 → Windows Server ISO
- VirtIO CD-ROM → drivers
Installing VirtIO
Now that we have the VirtIO ISO mounted to VM as a CDROM drive, navigate to the CDROM drive and run the exe installer (**virtio-win-gt-x64.exe**) It installs all the necessary VirtIO drivers for disk, network, and optional devices automatically. Once the drivers are installed, shut down the VM, change the NIC type to ‘virtio’ in virt-manager, and then start it back up for better throughput.
This step completes the configuration of the Windows Virtual Machine. When hce-dc01 was created, virt-manager automatically connected it to the default virtual network created by libvirt — Let’s verify that now
Verification
To confirm the virtual network is configured correctly, run virsh net-dumpxml default
<network connections=‘1’>
<name>default</name>
<uuid>73e80935-c747-4ad7-88a1-5417707abc02</uuid>
<forward mode=‘nat’>
<nat>
<port start=‘1024’ end=‘65535’/>
</nat>
</forward>
<bridge name=‘virbr0’ stp=‘on’ delay=‘0’/>
<mac address=‘52:54:00:d9:a6:2b’/>
<ip address=‘192.168.122.1’ netmask=‘255.255.255.0’>
<dhcp>
<range start=‘192.168.122.2’ end=‘192.168.122.254’/>
</dhcp>
</ip>
</network>
In the above snippet you will notice that bridge virbr0 is configured with a DHCP range from 192.168.122.2 to 192.168.122.254.
Login to the new VM and check its IP (ipconfig). You will see an IP within this range allocated by dnsmasq.
Also, remember this range must not overlap with the range your Wi-Fi provides (it usually doesn’t, but worth noting)
Summary
With these steps, we have a working virtual network and a Windows Server 2022 VM ready to be configured. In the next part, we will turn this VM into a fully functional Active Directory domain controller — laying the groundwork for identity in our hybrid environment.