In the first part, we laid the foundation for the hybrid cloud environment. Now we have a virtual network with VM running Windows Server 2022 Evaluation. In this part, we will focus on adding the Identity plane to the hybrid cloud environment by introducing a domain controller and creating an Active Directory structure. We will create a client VM, domain join it and make sure a domain user is able to login
We will be following the below sequence.
- Promote the Virtual Machine
hce-dc01, created in part 1 as primary domain controller and create domain, forest, and OU - Create user accounts
- Domain join a Windows client
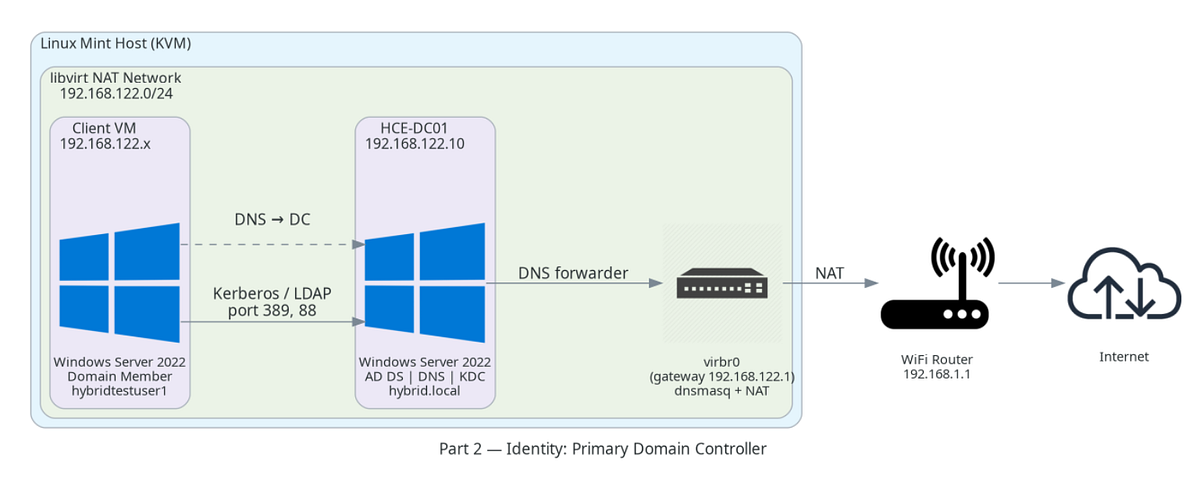
Primary Domain Controller Configuration
The official Microsoft documentation defines a domain controller as —
“A domain controller is a server that is running a version of the Windows Server® operating system and has Active Directory® Domain Services installed.”
For a simple hybrid cloud environment, a domain controller is not mandatory. So, why do we need this? Some hybrid scenarios depend heavily on the on-premises having an identity plane. Example, AD Connect. To introduce the identity plane in our virtual network, we need a server to manage the domain, forest, OU, users, policies, user authentication, and policy enforcement. This will be our domain controller, and the VM we created in part 1 will be used for this purpose.
Before starting this configuration we will run ip addr and take note down the IP range of the virtual bridge and Wi-Fi router. The output of the above command will be a list of all the interfaces running in your box with their IP ranges. Notice the virtual bridge, virbr0 (created when we set up the virtual network, refer to part 1) has a network range of 192.168.122.1/24, in my case
virbr0: <BROADCAST,MULTICAST,UP,LOWER_UP> mtu 1500 qdisc noqueue state UP group default qlen 1000
link/ether 52:54:00:d9:a6:2b brd ff:ff:ff:ff:ff:ff
inet 192.168.122.1/24 brd 192.168.122.255 scope global virbr0
valid_lft forever preferred_lft forever
Look for your Wi-Fi router range in the output. wlp58s0 is my Wi-Fi network and it has the range of 192.168.1.1/24
wlp58s0: <BROADCAST,MULTICAST,UP,LOWER_UP> mtu 1500 qdisc noqueue state UP group default qlen 1000
link/ether 04:ed:33:e3:9d:f1 brd ff:ff:ff:ff:ff:ff
inet 192.168.1.106/24 brd 192.168.1.255 scope global dynamic noprefixroute wlp58s0
valid_lft 84447sec preferred_lft 84447sec
inet6 fe80::d291:8b3e:4e0:cc87/64 scope link noprefixroute
valid_lft forever preferred_lft forever
virbr0 gateway is 192.168.122.1
wifi router gateway is 192.168.1.1
I will pick an IP from the virbr0 range and assign it to the newly created VM, which is going to be our primary domain controller.
Static IP for Domain Controller
The reason we need a static IP for the domain controller is to ensure that the domain controller is reachable even if the virtual network restarts. dnsmasq — we briefly touched on this in part 1, is responsible for assigning IPs to the virtual machines. When the virtual network restarts, it will act as the DHCP and start handing out IPs to all the VMs connected to virbr0. If the domain controller gets a different IP when the virtual network restarts, it will break the domain join for all the VMs that were part of the domain controller. To avoid this, we will assign static IP for the domain controllers.
Now that we know the IP range of virtual network, I will pick an IP, say 192.168.122.10 as my primary domain controller’s IP.
Login to the Windows Server we created in part 1 and follow below steps to set the static IP —
Before setting the static IP, rename the computer to
HCE-DC01if you haven’t done it already and restart.
Open Server Manager
- Click
**Local Server**-> Click the link next to**Ethernet** - A pop-up Right-click your Ethernet adapter →
**Properties** - Double-click Internet Protocol Version 4 (TCP/IPv4)
- Select
**Use the following IP address**option - Enter the below values:
IP address: 192.168.122.10 - The static IP we chose
Subnet mask: 255.255.255.0
Default gateway: 192.168.122.1 - Bridge’s IP
8. Select **Use the following DNS server addresses**
9. Set Preferred DNS server: 192.168.122.10
10. Click OK → Close all windows
Check if the static IP is updated by running ipconfig
When you set up the first Domain Controller, it must use itself as a DNS. Once the secondary domain controller is up, they should ideally cross reference each other
Note of VM rename — Rename the server before promotion — renaming a domain controller after the fact is painful.
Install Active Directory Domain Services Role
For a server to perform the role of a domain controller, it needs certain capabilities. These capabilities include a storage to persist the objects (forest, users, computers, groups, and policies), authentication layer, and policy enforcement mechanisms. This is not a exhaustive list of capabilities. I have listed only those relevant to our hybrid environment right now.
Active Directory Domain Services is a feature that you install on your Windows Server to make it a domain controller. Here is the official definition of AD DS — “A directory is a hierarchical structure that stores information about objects on a network. A directory service, such as Active Directory Domain Services (AD DS), provides methods for storing directory data and making this data available to network users and administrators. For example, AD DS stores information about user accounts, such as names, passwords, phone numbers, and so on. AD DS also provides a way for authorized users on the same network to access this information.”
Rough steps to install AD DS
Open Server Manager > Click Manage (top right) > Click Add Roles and Features > Click Next until you reach Server Roles > Check: Active Directory Domain Services> When prompted: Click Add Features > Click Next until Install & Click Install
I’m not going into the details of the installation as many resources document the process in detail.
With this, the virtual machine has a necessary feature to perform the role of a domain controller.
Promote This Server to a Domain Controller
Installing the AD DS role and promoting the server are two distinct steps, and it’s easy to miss why. Here is the distinction that matters. What makes a server a domain controller is not what’s installed — it’s whether a valid, initialised NTDS.dit exists, the NTDS service is running against it, and the network knows where to find it via SRV records. Promotion is the act of going from capable to instantiated.
Open Server Manager > You should see a yellow triangle notification at top right. Click it. > Click: Promote this server to a domain controller
Note on deployment configuration
While installing, pay attention to these attributes
- when the wizard prompts for a forest, Select:
Add a new forestRoot domain name can be given ashybrid.local - Domain controller options —
a. Forest functional level: leave default
b. Domain functional level: leave default
c. DNS Server should already be checked
d. Global Catalog should be checked
e. Do NOT check Read-Only DC
f. Set a Directory Services Restore Mode (DSRM) password (Write this down somewhere safe.) - Ignore the DNS delegation warning.
- When creating a new Active Directory forest, the setup process also asks for a NetBIOS name for the domain. NetBIOS is a legacy naming system that predates modern DNS-based Active Directory environments and is widely used in older Windows networks for computer and resource identification. It will auto-fill: HYBRID, Leave it.
Again, I’m not providing detailed steps on every screen of the wizard; this process is well documented. Apart from the attributes I have mentioned above, rest can be left with the default value. If you see any warning when checking the pre-requisites, you can ignore them. They will not have any effect on the environment we are building. We will revisit in future if needed.
⚠ After the installation, the server will reboot automatically.
After the reboot you will be able to login as Administrator to the new domain
Now, we the domain controller up and ready. As a first test, try nslookup google.com. You will see that the domain controller failed to resolve this query. Let’s fix this next.
Adding a DNS Forwarder
After installing Active Directory Domain Services, the Domain Controller also becomes the authoritative DNS server for the new domain (hybrid.local). At this point the DNS server knows how to resolve internal Active Directory records such as domain controllers, LDAP services, and domain-joined machines. However, it has no knowledge of external internet domains like google.com or microsoft.com. When a domain-joined machine sends a DNS query for an external address, the request reaches the domain controller but cannot be resolved. Configuring a DNS forwarder solves this by instructing the DNS server to pass any unknown queries to an upstream resolver (for example, the home router or a public DNS server such as 8.8.8.8). The domain controller therefore resolves internal names itself and forwards everything else, allowing domain clients to access the internet while still using the domain controller as their primary DNS server.
To set up the forwarder, Open Server Manager > Tools → DNS > Double click on your server name > Right-click → Properties > Go to Forwarders tab > Click Edit > Add the virbr0gateway IP 192.168.122.1
If try the lookup again nslookup google.com, it will resolve.
Without a forwarder, the DNS server attempts recursive resolution using root hints, which can introduce delays or timeouts in lab environments behind NAT. Configuring a forwarder provides a faster and more predictable path for resolving external names.
Creating User Accounts
Next, create normal domain users. In the domain controller, launch Active Directory Users and Computers, go to Users folder and create two test users. testuser1 and testuser2. Set password and enable the account.
Create a client VM to join the domain
Now that the domain controller is ready, we can test if client VMs are able to join the new domain we created. To test the domain join, spin up a new Windows VM , our client VM. I created another instance of Windows 2022 Server as I did not want to download another iso, just for the testing.
Join client VM to Domain
When you spin up a new client VM, its preferred DNS will be the gateway 192.168.122.1 (in line with the IP range of the virtual network).
Configure the Client VM’s DNS
Before joining the domain, its DNS server must point to the domain controller’s IP. The reason being the domain hybrid.local is not publicly resolvable like google.com — it exists only in the domain controller’s DNS. If the client VM uses any other DNS server, it will fail to locate the domain controller and the domain join will not proceed.
Set-DnsClientServerAddress -InterfaceAlias “Ethernet” -ServerAddresses 192.168.122.10
if the name “Ethernet” is not resolvable use the below command to look up the actual interface alias
Get-NetAdapter | select Name, InterfaceAlias, Status
Testing the Client
Step 1 — Check the DNS server (from Client VM)
On the client VM, open PowerShell as Administrator and run:
ipconfig /all
DNS Server should be 192.168.122.10
Step 2 — Verify if nslookup resolves (from Client VM)
On the client VM, test domain controller discovery via DNS.
nslookup _ldap._tcp.dc._msdcs.hybrid.local
It should return —
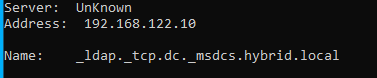
Above snip shows that the test VM now uses the domain controller as it’s DNS and DNS server is responding. We are good to join the domain.
Step 3 — Check if SRV record is correct (from Client VM)
Run nslookup in interactive mode: Inside the prompt, query the SRV record
set type=SRV
_ldap._tcp.dc._msdcs.hybrid.local
If you see your domain controller hostname listed under svr hostname DNS + SRV discovery is working.
Step 4 — Test LDAP connectivity (from Client VM)
From the client, test LDAP connectivity. Test-NetConnection 192.168.122.10 — Port 389.The response should say TcpTestSucceeded : True
Join the domain (from Client VM)
We are all set to join this VM to the domain. Run the below PowerShell command to join the domain
Add-Computer -DomainName hybrid.local -Credential HYBRID\Administrator -Restart
What happens internally:
- Client queries DNS for domain controller (SRV record)
- Client contacts domain controller via LDAP
- Admin credentials authenticated (Kerberos/NTLM) to authorize the join
- Domain controller creates a Computer Object in AD
- Machine account password established — this becomes the secure channel secret
- Client reboots as domain member
Verification
Domain membership verification — Log in as HYBRID\testuser1 - that you created earlier. Run whoami; should return: hybrid\testuser1.echo %logonserver% should show your domain controller hostname \\HCE-DC01.
This proves that Kerberos + secure channel + domain controller communication is working.
Validate AD Object Creation — On the domain controller, if you open **Active Directory Users and Computers** and go to **Computers** you should see your client machine listed. This proves that AD object lifecycle works.
Summary
In this part we set up a domain controller, domain joined a VM and tested the connectivity. Although single Domain Controller set up works, it is a single point of failure. If the only domain controller fails:
- Authentication stops
- Kerberos tickets cannot be issued
- Group Policy stops applying
- New logons fail
In the next part, we will build redundancy for the domain controller by adding a secondary domain controller.