In the previous parts, we created a primary and secondary domain controller and tested the domain join from Windows client VM. In this part, we will domain-join a Linux VM to the domain controllers we created. The main purpose is to introduce a non-Windows system into the domain to test Kerberos authentication against Active Directory. We will —
- Provision a new Linux VM
- Assign the DC IP
- Install Linux Kerberos client tool
- Join the domain
- Validation
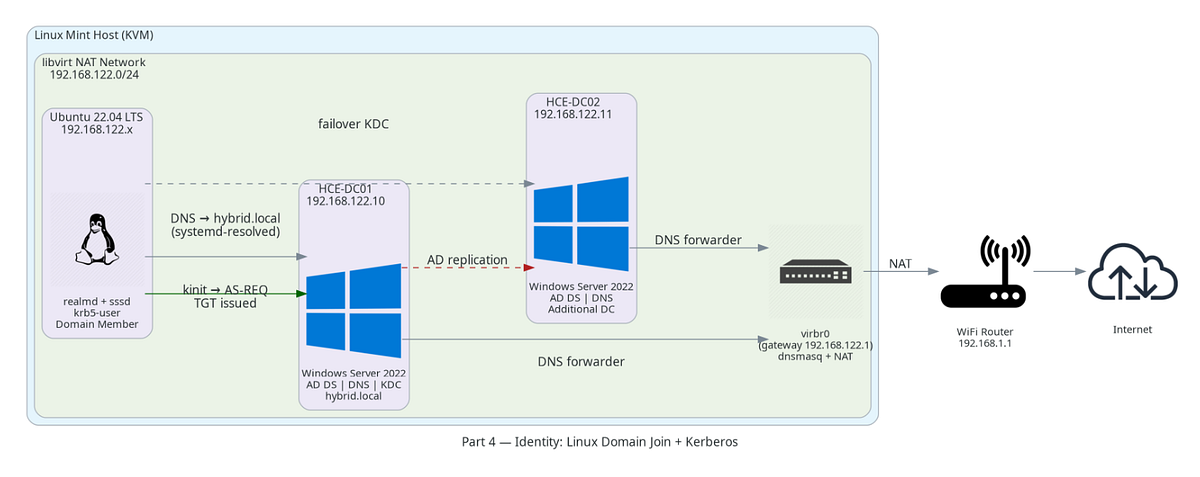
The fundamental domain join mechanics are the same for Windows and Linux. The underlying authentication protocol (Kerberos) is identical for both — the difference is integration depth. Windows has native AD support built in, whereas Linux requires explicit configuration via tools like realmd, SSSD, and the Kerberos client utilities. So, let’s get started with a new VM.
Provision a new Ubuntu VM
We will create a VM based on Ubuntu 22.04 LTS for our virtual network. You need to download the Ubuntu iso and create a VM using virt-manager following the regular VM creation process. Once the VM is up and running, let’s start with some connectivity checks.
Connectivity Checks:
Ping DCs:
ping 192.168.122.10
ping 192.168.122.11
This will work because the Linux VM will be created in the same network range as the Windows client or the DCs. If this is not the case, ensure you map the VM to the relevant network using the virt-manager (This can happen if you have multiple virtual networks running in your system)
Add the DC IP to the resolv.conf
This step is like what we do for a Windows client, just that we do it a bit differently. The Linux VM should use the Domain Controller’s IP as its DNS server. The fresh Linux VM will have the DNS pointing to itself at 127.0.0.53
If you remember, we used the GUI to change the preferred DNS for the VM in Windows. In Linux, the DNS server details reside in /etc/systemd/resolved.conf
On modern Ubuntu systems, the file
/etc/resolv.confis not meant to be edited directly because it is automatically generated and managed by thesystemd-resolvedservice. Any manual changes you make will be overwritten. Instead, you should configure DNS settings in the source of truth, typically/etc/systemd/resolved.conf(or via Netplan/NetworkManager depending on your setup), and then restart the service.
Note — Even if
/etc/resolv.confappears stable after manual edits, it is still managed by the system in most modern Ubuntu setups and may be overwritten on reboot or network changes. Always configure DNS through systemd-resolved or Netplan for reliability
Edit the resolved.conf to set the DC’s IP as the DNS server for the Linux VM
sudo nano /etc/systemd/resolved.conf
[Resolve]
# Some examples of DNS servers which may be used for DNS= and FallbackDNS=:
# Cloudflare: 1.1.1.1#cloudflare-dns.com 1.0.0.1#cloudflare-dns.com 2606:4700:4>
# Google: 8.8.8.8#dns.google 8.8.4.4#dns.google 2001:4860:4860::8888#dns.go>
# Quad9: 9.9.9.9#dns.quad9.net 149.112.112.112#dns.quad9.net 2620:fe::fe#d>
DNS=192.168.122.10 192.168.122.11
#FallbackDNS=
Domains=hybrid.local
#DNSSEC=no
#DNSOverTLS=no
#MulticastDNS=no
#LLMNR=no
#Cache=no-negative
#CacheFromLocalhost=no
#DNSStubListener=yes
#DNSStubListenerExtra=
#ReadEtcHosts=yes
#ResolveUnicastSingleLabel=no
#StaleRetentionSec=0
Restart and check that value has persisted.
sudo systemctl restart systemd-resolved
Verify DNS resolution:
Now that the DNS has been updated try nslookup hybrid.local The expected output is
Server: 127.0.0.53
Address: 127.0.0.53#53
Name: hybrid.local
Address: 192.168.122.10
Name: hybrid.local
Address: 192.168.122.11
The server shown as 127.0.0.53 is the systemd-resolved stub — this is expected, as systemd-resolved intercepts all DNS queries locally before forwarding them upstream. Queries are forwarded to the configured upstream DNS servers (your DCs). The returned addresses confirm that DC DNS is now authoritative for hybrid.local
Install Kerberos Client Tools
From this step onwards, the process of domain join is different from Windows. While the Windows client has necessary Kerberos modules, Linux client should be enabled to communicate with Active Directory using Kerberos. To do that install the Kerberos client tool, [krb5-user](https://web.mit.edu/kerberos/krb5-1.4/krb5-1.4/doc/krb5-user.html)
What does krb5-user really do? It installs client end tools that enable communication with a server using Kerberos. In Kerberos, the password is never sent over the wire. Instead, it is converted into a cryptographic key, which is then used to encrypt a timestamp during pre-authentication, which will subsequently be decrypted by the server. The validation is the ability of the server to “decrypt” the client request using its version of the stored key — and this is precisely why clock skew breaks Kerberos. If the timestamp is outside the allowed window, the DC rejects it regardless of whether decryption succeeded.
Notes:
When the DC was promoted, the admin password you provided was hashed using DC’s preferred ‘method(s)’ (etype) and stored in ntds.dit (e.g. AES256 key stored against account)
When a Linux VM is created the krb5.conf file defines supported etypes
When the Linux VM wants to authenticate with the Windows AD, you initiate the Kerberos flow by running
kinit
Client VM’s
kinitsends → AS-REQ to DC saying, “I am administrator, The Client VM supports AES256, AES128, RC4”
DC responds saying “I need pre-auth, and for this account I use AES256”
Client then derives a key from the password (using the required encryption type, e.g., AES256) → uses this key to encrypt timestamp in Client VM. This is sent as AS-REQ (with pre-auth): username + AES256-encrypted timestamp
The DC decrypts this AS-REQ with the stored AES256 key against this user, validates the timestamp is within the allowed clock skew window (default 5 minutes) → issues TGT
The default TTL of a Kerberos TGT is 10 hours
Let’s proceed with the setup.
sudo apt update
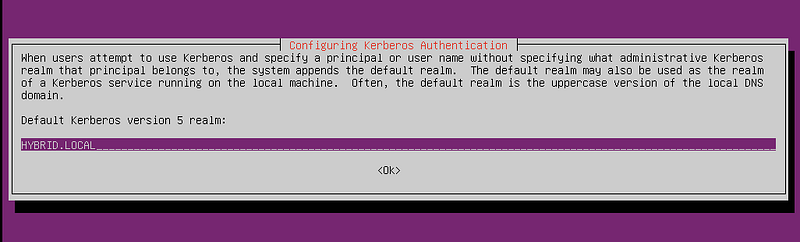
sudo apt install krb5-user -y
Prompt: Enter default realm → HYBRID.LOCAL (uppercase).
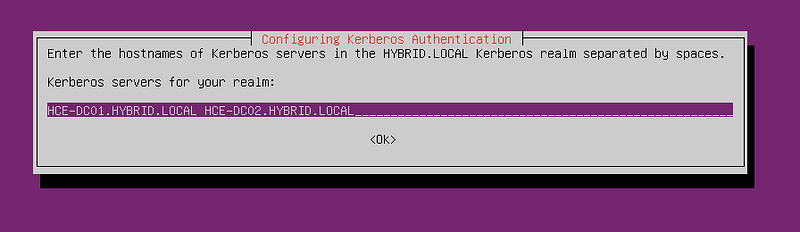
In the next prompt provide the FQDN on your DCs separated by space
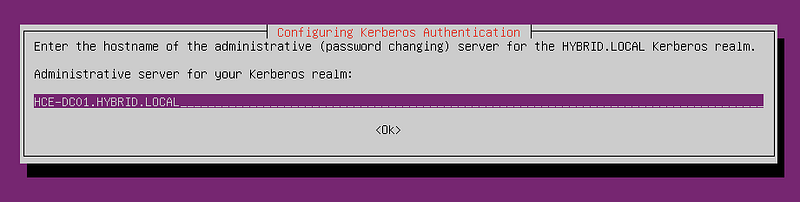
And finally when asked for primary DC, provide your primary DC’s FQDN
Run dpkg -l | grep krb5-user It should list krb5-user as installed.
Configure /etc/krb5.conf
We have installed the necessary client tools to enable Kerberos based exchange from the Linux VM. Next, the Linux VM’s Kerberos client must point to the Key Distribution Centers in the Active Directory. Update sudo nano /etc/krb5.conf as described below
[libdefaults]
default_realm = HYBRID.LOCAL
dns_lookup_realm = false
dns_lookup_kdc = true
[realms]
HYBRID.LOCAL = {
kdc = 192.168.122.10
kdc = 192.168.122.11
admin_server = 192.168.122.10
}
[domain_realm]
.hybrid.local = HYBRID.LOCAL
hybrid.local = HYBRID.LOCAL
Confirm your changes have persisted — cat /etc/krb5.conf
we will validate if AD is issuing Kerberos tickets to us by requesting a Ticket Granting Ticket from AD KDC. Run kinit [email protected] and enter Administrator password.
Next run klist
You should be seeing a ticket as below:
Default principal: [email protected]
Valid starting Expires Service principal
03/06/26 19:11:11 03/07/26 05:11:11 krbtgt/[email protected]
If you are curious about the attributes of the ticket, run klist -f # shows flags like forwardable, renewable or klist -e # shows encryption types
Join Linux to Domain
We have the foundation required for a domain join. Now, we will install the required packages for the domain join
sudo apt install realmd sssd sssd-tools adcli samba-common-bin oddjob oddjob-mkhomedir -y
realmd — discovers which domains or realms it can use or configure. It can discover and identify Active Directory domains by looking up the appropriate DNS SRV records.
sssd — System Security Services Daemon. After the join, this is what runs continuously to handle authentication requests — it talks to the DC for login, group membership, sudo rules etc. The long-running engine.
sssd-tools — CLI utilities for sssd (
sssctl,sss_overrideetc.) — useful for cache flushing and diagnostics.
adcli — Active Directory CLI. realmd uses this under the hood to perform the low-level AD join operations (creating the computer object in AD, setting up the machine account).
samba-common-bin — provides tools like
netandwbinfothat realmd/sssd lean on for certain AD operations.
oddjob — a D-Bus service that runs privileged helper tasks on behalf of other services. sssd uses it to do things it can’t do as its own user.
oddjob-mkhomedir — the specific oddjob helper that automatically creates a home directory the first time a domain user logs into the Linux machine. Without this, a domain user authenticates successfully but lands with no home directory.
realmd + adcli → join-time (one-off operation)
sssd + sssd-tools → runtime (ongoing authentication)
oddjob + mkhomedir → login-time helper (home dir creation)
samba-common-bin → shared plumbing both layers use
Verify the configuration and connectivity to the domain controller
sudo realm discover hybrid.local
hybrid.local
type: kerberos
realm-name: HYBRID.LOCAL
domain-name: hybrid.local
configured: no
server-software: active-directory
client-software: sssd
required-package: sssd-tools
required-package: sssd
required-package: libnss-sss
required-package: libpam-sss
required-package: adcli
required-package: samba-common-bin
The above proves network connectivity to the DC, correct DNS resolution, and that AD is responding to discovery queries.
Join the domain as Administrator
sudo realm join --user=Administrator hybrid.local
Post domain join, verify the configuration and connectivity to the domain controller
sudo realm list
hybrid.local
type: kerberos
realm-name: HYBRID.LOCAL
domain-name: hybrid.local
configured: kerberos-member
server-software: active-directory
client-software: sssd
required-package: sssd-tools
required-package: sssd
required-package: libnss-sss
required-package: libpam-sss
required-package: adcli
required-package: samba-common-bin
login-formats: %[email protected]
login-policy: allow-realm-logins
Run, id [email protected]you will see that the testuser1 is looked up from the Domain Controller by the Linux Client.
Enable automatic home directory creation:
sudo pam-auth-update
# Enable “Create home directory on login”
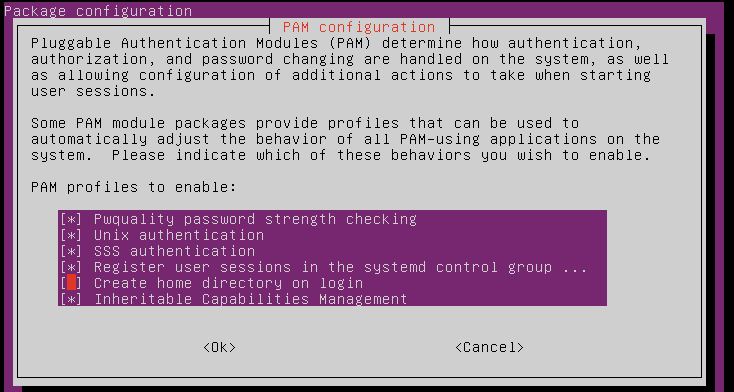
Enable “Create home directory on login”
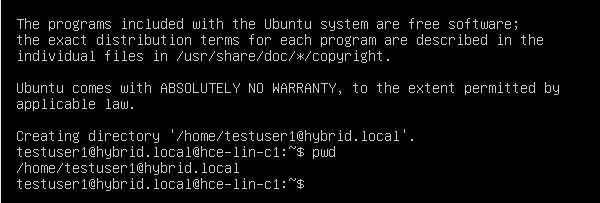
Verification
As a final test, you should be able to successfully login using one of the test users you had created and used for the Windows client ([email protected]). Notice that the home directory for testuser1 is created.
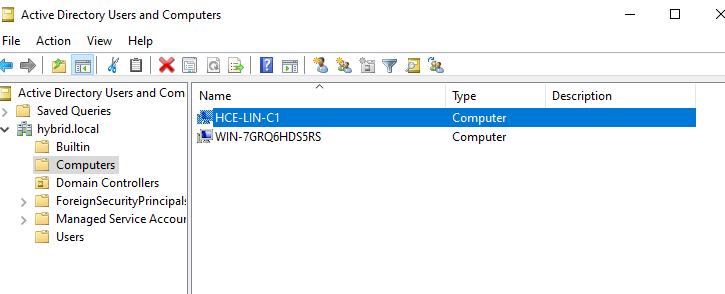
Also, login to the DC and see a new Linux VM getting added there under hybrid.local > Computers
Summary
This concludes the part of the series where we established an on-premises identity foundation. In this series, so far, we have established
- A functioning Active Directory forest (
hybrid.local) with two domain controllers - Multi-master replication verified across both DCs — SYSVOL, NETLOGON, and directory objects
- FSMO roles identified and accounted for
- A Windows client and a Linux VM both domain-joined and authenticated via Kerberos
- DNS working end-to-end: internal resolution via the DC, external resolution via the forwarder
Up next, a S2S VPN tunnel with Azure which would complete the hybrid connectivity foundation